A folding sawhorse for small spaces should fit both the place you store it and the room you have when the legs are open. Measure the complete pair, then check your path around the work. A slim fixed-height pair suits most occasional jobs. Add rails or height adjustment only when a project needs them.
How to size a folding sawhorse for small spaces
A folded horse can fit beside a cabinet and still take up too much room on the floor when opened. Record the folded dimensions, open stance, and room needed for the workpiece. Then walk the route from storage to setup, including corners and any doors that swing into the way.
Measure the slot where both horses will live
Pick a real storage location and measure its clear height, width, and depth. Account for hinges, handles, projecting feet, and the space needed to grasp the unit as you remove it. Compare the dimensions with both horses together in the position where they will be stored.
A brochure might quote the thickness of a single folded horse. Two may stack deeper than expected if the carrying handles or pivots do not nest. For example, two units folded to 3 inches thick would take about 6 inches if stacked directly, before allowing for protrusions and hand clearance. Use the manufacturer’s actual folded dimensions and check the pair arrangement on the floor when possible. Leave room to slide either horse out without dismantling nearby storage.
A long steel horse can fit in a shallow slot yet fail to clear a turn on the way to it. If the storage is behind a closet door, make a cardboard outline or use a lightweight strip marking the packed length. Carry it past the door, around the corner, and into position. Take the measurement with the door at the angle you can actually open it. A short turn inside a closet can determine the maximum length more directly than the depth of the slot.
Plan storage for the rest of the setup. A pair may only need a narrow space while the plywood top needs a larger, secure position. A rail kit can leave lumber, sawbucks, and clamps spread across the room. Keep small accessories together and store a removable panel so it cannot tip into a walkway. Check the manufacturer’s recommended storage position and the rating of any rack or restraint you use.
Check the open stance and your working aisle
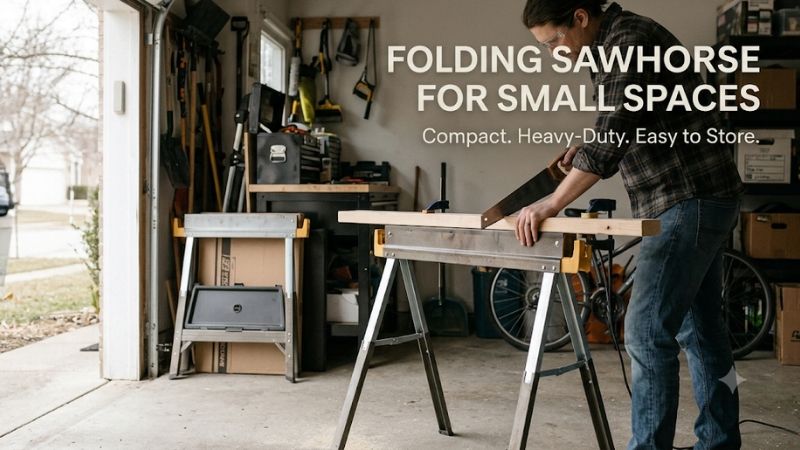
The spread of the feet determines where you can stand and where you can put a second horse. Mark the open outline on the floor using the foot positions. Add the workpiece, clamp handles, and the path your hands and feet need to follow while you work on the piece.
For a narrow garage bay, start with the car removed and identify obstacles that stay put. Mark the bench, freezer door, shelving, and door to the house. Lay painter’s tape at the four feet of each horse using dimensions from the product drawing or a measured display sample. Walk the side from which you expect to work. Then repeat with a cardboard outline of the project surface. A corner where the empty feet clear can become too narrow once a cabinet panel overhangs.
Think about both ends of a board. Carrying an eight-foot piece in from the driveway can be the longest movement of the day. You may need to rotate it or feed it in from the end. Your layout should let you set it down without lifting it over a tool or stepping around feet that are hard to see. Keep the required working area clear of parked vehicles and avoid working in a path other people need to use.
Check any fallback orientation before you buy. Turning the supports ninety degrees might clear a door and make clamping easier. It can also put the span or blade path in a different relationship to the supports. Mark both orientations and select the one that gives a stable setup and lets you approach the whole operation without stretching.
Compare the finished height with the work you do
Working height includes everything between the floor and the surface touching the project. A rail, pad, or topper lifts the work. A modest difference can change how you control a hand plane, reach an assembly mark, or pass a piece between two supporting surfaces.
Measure a table you already like to work at. Try the posture you use for sanding a board and the one you use for assembling a tall box. For a 30-inch horse and a 3/4-inch top placed directly on a supported beam, the top would sit about 30¾ inches high. A rail between the two changes the calculation. Draw the complete stack and compare that plane with your working height.
A small space tends to magnify height problems. If you are working by a wall, you may have only one direction from which to lean or reach. A lower work surface makes it easier to reach across some wide workpieces. A higher surface may help a close inspection or a detail task. Before selecting a telescoping model, list at least two jobs that would use different settings. Otherwise a fixed-height pair can simplify storage and positioning.
If the horses will supplement a bench or a tool station, verify the height under the maker’s specified setup. A board should have consistent intended support as it moves. An outfeed surface that is set incorrectly can catch or raise the stock. Ask whether the tool needs its own approved stand or stationary support before treating a folding horse as an extension.
Which compact design fits your projects?
A lightweight fixed-height pair suits many short sessions. Folding steel with built-in lumber arms can create a wider temporary work surface. Adjustable legs and clamps add useful functions when they address a specific job. Each option has a different footprint when the garage is packed away.
Choose a lightweight pair for frequent carry
A printed weight should tell you whether it applies to one horse or both. Lift a comparable object and think about the walk from storage, especially if it includes stairs or a doorway. Some lightweight pairs are easy to move in one trip when the accessories stay with them.
A small garage often works as a staging point. You may carry the supports outside to paint a door or sand a piece, then take them in when the job is over. A low transport weight matters every time you move and store the pair. Check for a secure folded position and a grip you can reach without putting your fingers in the hinge area. Two thin bodies that slide apart on the way through a door can be harder to carry than a slightly heavier pack with practical handles.
Lightweight material can suit its intended work. Check the maker’s load and floor requirements for the exact set. Fully deploy the legs and secure the braces before loading. A pair holding an evenly distributed load faces different forces from a light stand being pushed sideways by a long panel. If your work routinely applies steady lateral force, check whether the documented configuration supports that task or consider a suitable bench.
Manufacturers sometimes offer a lightweight pair with small supports for nominal lumber. Those accessories can make the setup more useful without dedicating permanent floor space to a table. Count the size and number of rails and any tray or clamps as part of what you need to carry and store.
Choose rail brackets when you need a real tabletop
A matched pair with compatible lumber supports can hold a temporary worktop where its instructions permit. The tabletop can be sized for the work instead of leaving a full bench in place. Plan how the rails, topper, project, and applied force will be held in the approved setup.
A simple example is a person who normally needs a small assembly surface and sometimes works with cabinet panels. A compact topper might cover the short jobs while a larger approved configuration accommodates panels. Confirm that both sizes sit correctly on their supports, and check whether the topper needs to be secured according to the manual. The outside edge needs adequate support wherever you will use a clamp or press down.
The frame connections matter. An arm that accepts a nominal 2×4 in a particular orientation should be used as directed. A rail turned on edge may sit differently or raise the work surface beyond what you planned. A thick, heavy topper can be difficult to handle alone even if its weight fits the rated configuration. Choose a size you can move and position without improvising.
Store the rails and panel so putting the table away takes only a few planned moves. For many small spaces, assembling a temporary bench works best when every part has a permanent location nearby. When you constantly need to remove boxes to get to a topper, a smaller portable clamping table might be more likely to come out.
Choose clamps or height adjustment for a specific task
Extra features are worth carrying when they remove a step you repeat. A built-in clamp can hold trim steady while you reposition it. Adjustable legs can bring the work plane to a matching height. Check where each mechanism sits once the workspace is opened.
Think of sanding a narrow face frame. An integrated clamp could hold the work without a wider benchtop. Check whether the jaw reaches the intended spot and whether its handle swings into your aisle. A clamp high at the end of a long panel can apply leverage to the setup. Follow the supported work positions and use a configuration that stays stable with the direction of force you need.
Adjustable-height horses suit a shared space with more than one regular working surface. Measure the height increments. Some series offer a useful overall range but cannot reach the exact plane you need with the topper you chose. Apply the appropriate settings to both horses unloaded, then verify the top plane and support before using them. A range printed on the box is helpful only when its positions fit the task.
Features have stored dimensions as well. Long track rails, clamp jaws, and telescoping feet may add weight or protrusions. If one thin wall slot is the only possible location, compare the actual stored body and any detachable accessories. A fixed-height pair is often sufficient for open cutting support or paint staging.
How to use a folding sawhorse for small spaces all week
Make setup and teardown part of the buying decision. A small shop benefits from a repeatable place for the horses, a clear material path, and a way to contain tools and offcuts. Mark one arrangement that works for everyday jobs, then plan larger work separately.
Build your layout around project size and access
A narrow worktop can be an excellent fit for hand tools, trim, and small assembly. Sheet goods need a larger support plan and a path to carry, rotate, and remove them. Sketch the piece at full size on the floor before deciding the work can happen in the usual bay.
For a board job, leave clear space at the end where stock enters. Put tools where you can retrieve them without stepping over a horse or walking beneath projecting stock. For a full sheet, mark its four corners and check whether you can reach the required edges. Then check the blade path and support both sections according to the saw manufacturer’s manual. Two supports that carry a sheet may still need an appropriate additional support surface.
If you share a garage, plan a separate sequence for a large project. Moving the car, carrying the sheet, and setting up a larger surface may be the practical choice for an occasional job. For frequent panel work, consider whether a suitable full-support surface in a different location is worth arranging. A narrow garage can still support efficient trim work even when full sheets need another plan.
Give intermediate parts a safe place, such as a suitable rack or bench, before you start. The next piece and completed piece both need space. Keeping the area for your feet clear makes the work easier and reduces the temptation to balance a tool on the corner of a narrow horse.
Plan storage where teardown is easy
A good storage plan includes one place for both horses, one spot for the rails, and a container for small accessories. Position the equipment so you can take it out in setup order. Clearance for loading the stored equipment and reaching its handles matters as much as the width of the slot.
If the folded bodies lean in a narrow gap, use storage that restrains them appropriately and keeps their weight within the mount’s rating. A bench hook or wall rack needs the right installation and enough depth for the bodies. If you rent, see whether a freestanding shelf or secure storage nook suits the equipment and is permitted. Keep stock and accessories from falling out as you take the horses down.
Once the job is finished, remove the workpiece and all other load before folding. Watch fingers and the position of any loose rail. Loose hardware should go straight into its pouch or tray so it is available the next time. Sweep the work area and confirm the floor path is clear before putting a vehicle or other large object back into the bay.
A fast-folding design helps if the route to storage also stays easy. Try putting away the full kit on a normal evening to identify which piece takes the longest. The problem may be a heavy topper or a lumber rail without a slot. Fixing that bottleneck can do more for a small workshop than buying another pair.
Try a dry setup before keeping the pair
Set up both horses unloaded on the floor where you expect to work. Check that their feet sit as intended and the locks or braces engage. Walk around them with a lightweight outline of the usual workpiece. Then fold them and check the route back to storage.
Test one short job, one long board, and any everyday clamp position. Use a representative tape outline or piece that you can move safely. Change the position of the supports if you discover a foot block or hand clearance issue before working on real stock. If the legs or project prevent you from standing square to the operation, look for a different orientation or design.
A compact pair succeeds when it completes both jobs on the same day. It opens into a stable work area with enough access, then folds into the designated space without displacing another project. Keep the model that makes that cycle easy for the work you do most often.
Also test how you would retrieve a dropped clamp or remove a scrap that gets caught between the feet. A piece can be easy to lay down while making the floor surprisingly difficult to reach from the other side. A clear recovery path is worth planning, particularly when only one person can work in the bay. If something falls into the work area, stop the operation and clear it before continuing. This check is easiest with no tools running and an empty layout.
Conclusion
Choose a lightweight folding pair for frequent carry, a compatible rail system for a temporary bench, and adjustable height only when it serves regular work. Measure the stored pair and open footprint, then check the floor, workpiece, and aisle together before committing space to the setup.
More from Amazon
Programs that pair well with the guide above. Offers and eligibility are set by Amazon and may change.
Collect the home and kitchen items you want in one registry that guests can shop from.
Create a wedding registrySet up recurring deliveries of everyday items on eligible products. Terms and savings are set by Amazon.
Explore Subscribe & SaveFree shipping on eligible items, Prime Video and more. Eligible new members can start with a free trial.
Start a Prime free trialAudiobooks and podcasts to listen to on the go. Eligible new members can start with a free trial.
Try Audible freeAs an Amazon Associate we earn from qualifying purchases.