
A garage gym lives or dies by what’s under your feet. Bare concrete telegraphs every dropped dumbbell into the slab, chews up the soles of your shoes, and turns a 6 a.m. session into a knee-ache. I learned this the expensive way after a 45 lb plate slipped off a barbell collar and left a divot in the floor I still park over. Flooring is the cheapest insurance you’ll buy for a home gym, and it’s usually the first thing people skimp on.
The good news: you don’t need a commercial contractor or a four-figure budget. Most of the best home gym flooring ships flat-packed, drops into place without adhesive, and can be cut with a utility knife and a straightedge. Below I’ve broken down the options by what they actually do well — shock absorption for deadlifts, cushion for floor work, grip for sled pushes — plus the honest tradeoffs on smell, weight, and how much of a Saturday each one will cost you.
Our top picks


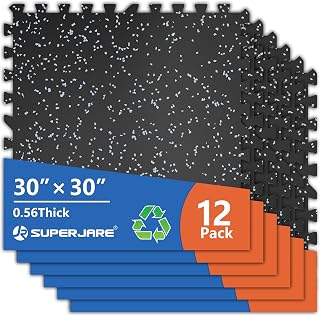

As an Amazon Associate we earn from qualifying purchases at no extra cost to you.
As an Amazon Associate we earn from qualifying purchases.

Quick Comparison
| Flooring Type | Typical Thickness | Best For | Install Difficulty | Relative Cost |
|---|---|---|---|---|
| Rubber stall mats | 3/4 in | Barbell work, heavy drops | Hard (very heavy sheets) | $ per sq ft |
| Interlocking rubber tiles | 3/8–1/2 in | Mixed-use gyms, odd room shapes | Easy | $$ |
| EVA foam tiles | 1/2–1 in | Yoga, bodyweight, kids’ spaces | Very easy | $ |
| Rolled rubber | 1/4–3/8 in | Large open rooms, cardio zones | Moderate | $$ |
| High-density drop pads | 2–3 in | Olympic lifting, dedicated platforms | Easy (spot placement) | $$$ |
| Artificial turf roll | 3/8–3/4 in pile | Sleds, carries, sprints | Moderate | $$ |
How to Choose
- Match thickness to your heaviest drop, not your average lift. Bodyweight and dumbbell work is fine on 1/2 inch. If you deadlift above 225 lb or drop loaded bars, you want 3/4 inch of solid rubber minimum, and ideally a stacked layer where the bar lands.
- Check the subfloor first. Concrete tolerates almost anything. Wood subfloors over a crawlspace flex and transmit sound, so lean toward thicker rubber plus a foam underlayment, and confirm your joists handle the load of a rack.
- Weigh the install literally. A single 4×6 ft stall mat runs about 95–100 lb. That’s a two-person carry up any stairs. Interlocking tiles at 10–20 lb apiece are the realistic choice for basements and second floors.
- Budget for the smell. Recycled rubber off-gasses, sometimes for weeks. Ventilation, a scrub with dish soap and a stiff brush, and patience fix it. If your gym shares air with a bedroom, virgin rubber or EVA foam is worth the premium.
- Plan the seams around your equipment. Put full tiles under the rack footprint and push cut pieces toward the walls. Seams under a treadmill or bench will creep and separate no matter how tight they start.
Top Picks Reviewed
3/4-Inch Rubber Stall Mats — Best Value for Heavy Lifting
Sold for horse barns, these are the open secret of garage gym flooring. A 4×6 ft mat covers 24 square feet for roughly the price of six interlocking tiles, and the density is genuinely commercial-grade. They lie flat under their own weight once you let them relax for a day or two, so no glue is needed. The catch is handling: fold one in half, get a friend, and use a hook or a pair of vice grips as a handle. Trimming requires a fresh utility blade, a straightedge, and several passes — expect to sweat.
1/2-Inch Interlocking Rubber Tiles — Best Overall Balance
Puzzle-edge rubber tiles give you 90 percent of the protection of stall mats with a fraction of the hassle. Two-foot squares are easy to carry, easy to cut, and easy to reconfigure when you move a rack or add a bike. Because they lock, they resist the sliding that plagues loose mats during lateral movement. Most sets include straight-edge border pieces so the perimeter looks finished rather than saw-toothed. This is what I’d recommend to someone flooring a spare bedroom or a basement corner.
EVA Foam Interlocking Tiles — Best Budget Starting Point
Foam is the cheapest way to cover a lot of ground, and for stretching, kettlebell flows, HIIT, and kids using the same space, it’s genuinely pleasant. Understand the limit: a dumbbell corner will dent it permanently, and a rack’s feet will sink in. Use foam as a general-purpose surface and place a rubber mat or drop pad where the heavy stuff happens. Cleanup is a damp mop, and a single tile can be swapped out when it gets torn.
Rolled Rubber — Best for Wall-to-Wall Coverage
If you’re doing an entire two-car garage, rolls beat tiles on both cost per square foot and seam count. A 4 ft wide roll unspools into long continuous runs that look near-professional. Two things to know: rolls arrive tightly wound and heavy, often 150 lb or more, and they need to acclimate flat for a couple of days before they’ll stop curling. Double-sided seam tape at the joints keeps everything honest.
High-Density Drop Pads — Best for Olympic Lifting
These are 2- to 3-inch crumb rubber blocks built to eat the energy of a bar dropped from overhead. You place them in pairs on either side of a lifting platform rather than covering the room. They protect the slab, protect the barbell’s bearings, and cut the noise your neighbors hear. Overkill for general training, essential if you snatch or clean and jerk.
Artificial Turf Roll — Best for Sleds and Conditioning
A 3 ft wide turf strip down one side of the gym transforms what you can train. Sled pushes and drags, bear crawls, farmer’s carries, and prowler work all need a surface with drag and grip that rubber doesn’t provide. Turf also handles wheeled equipment well. Lay it over your existing rubber or directly on concrete, and pick a low-pile, non-infill product so it stays put and stays cleanable.
Frequently Asked Questions
Do I need to glue rubber flooring to concrete?
For home use, almost never. The weight of 3/4-inch rubber holds it in place, and interlocking tiles hold each other. Skip the adhesive so you keep the option to move or resell. Use double-sided seam tape only where rolls meet or where a mat edge sits in a high-traffic doorway.
How do I get rid of the rubber smell?
Scrub both sides with warm water and a degreasing dish soap, rinse, and let the mats air out — outdoors, ideally, or in an open garage with a fan. Most of the odor dissipates in one to three weeks. A box of baking soda or an activated charcoal bag nearby helps in the meantime.
Will this protect a second-floor room or an apartment?
It reduces impact noise substantially but won’t eliminate it. Rubber plus a closed-cell foam underlayment is the best stacked approach. For anything above another dwelling, also change the training: dumbbells set down under control rather than dropped, and no bumper plate work at all.
What thickness handles a squat rack?
Half-inch rubber under a bolted or heavy-duty freestanding rack is fine — the load spreads across the feet. Avoid putting a rack directly on foam, which compresses unevenly and lets the uprights rock. If you’re bolting into concrete, cut clean holes in the mat rather than sandwiching the flooring under the base plate.
Final Thoughts
Pick the flooring that matches your heaviest movement and the reality of getting it into the room. Stall mats win on pure value if you have ground-floor access and a helper; interlocking rubber tiles win on convenience and flexibility for everyone else; foam is the honest budget answer for training that never gets loaded. The smart play for most home gyms is a hybrid — inexpensive coverage across the room, dense rubber where the weights land, and a turf lane if you have the space. Buy enough to cover the area once, let the material rest flat before you commit to cuts, and you’ll be done in an afternoon with a floor that outlasts the equipment sitting on it.
8 Best Gym Mats for Home: Rubber vs Foam Picks for Any Floor
Best gym mat for home choices come down to material density and...
8 Best Rowers for Home Gym: Air, Magnetic and Water Compared
Best rowers for home gym shortlists usually collapse once someone measures the...
8 Best Weight Home Gyms: 6 All-in-One Machines for Small Rooms
Best weight home gym decisions come down to two numbers before brand...
8 Best Home Gym Equipment for Beginners: The Starter Setup
Best home gym equipment for beginners is not a machine – it...
Best Treadmills for Home Gym: 5 Picks by Deck and Motor
Best treadmills for home gym decisions come down to two specifications and...
8 Best Home Gym Compact Setups: 6 Space-Saving Picks Ranked
Best home gym compact claims usually quote a stored footprint and stay...
Best Adjustable Bench for Home Gym: 5 Picks Ranked by Use
Best adjustable bench for home gym decisions turn on three numbers most...
Best Cable Machine for Home Gym: 5 Picks and Pulley Ratios
Best cable machine for home gym shortlists collapse quickly once you convert...
8 Best Cable Machines for Home Gym: 5 Types and Their Limits
Best cable machines for home gym use are not one product category...
8 Best Home Gym Setups: Floors, Ceilings, Noise and Layout
Best home gym setup guides talk about equipment and skip the room,...
Write Your Review
No reviews yet. Be the first to share your experience!